Although Google Drive has a very powerful search feature, my training sessions always have participants who are having difficulty finding files in Google Drive. This is usually because they are just typing a keyword in the search box and hoping for the best! This typically produces a large number of search results, meaning they have to spend time sifting through them to find the right file, and sometimes still can’t find it. No wonder they are frustrated! In this blog post, I’ll share my top five tips for searching effectively in Google Drive.
[bctt tweet=”Frustrated with searching #GoogleDrive? These five tips can help!!” username=”samvardanega”]
Tip 1: Use the search shortcuts
When you click in the Google Drive search box, a box appears with shortcuts to searches that you may want to perform. These include your recent search terms, people you have been sharing files with, types of files and files edited recently. Based on the image below, if I wanted to see a list of presentation files in Drive, I could click on the ‘presentations’ icon. Similarly, if I wanted to see files that Adrian has shared with me, I would click on his name.

These search shortcuts provide a quick and easy way to start an advanced search. After you have clicked on one of the shortcuts, the relevant search operator will be shown in the search box. You can then add extra search terms to refine your search even further.

Tip 2: Use other advanced search options
Google Drive has heaps of advanced search options that you can use to refine your search and pinpoint the exact file you are looking for. You can access some of these from the Advanced search drop-down, which is accessible either from the button at the bottom the search shortcuts box, or by clicking on the drop down arrow on the right side of the search bar.

An outline of the options available in the advanced search box is shown below. Two options that are particularly useful to understand are ‘Item name’ and ‘Includes the words’. By default, a Google Drive search will look for a keyword in the file name AND the body text of the file (i.e. it uses ‘Includes the words’). While ‘Includes the words’ is a great search option if you are unsure what a file is called, it means you can get a lot of search results if you are searching for a keyword that appears frequently in your files. So, if you do have an idea about what a file is called, use the ‘Item name’ search option instead. I find this particularly effective when used in conjunction with the ‘Type’ option.

[bctt tweet=”Have you been using the advanced search box in #GoogleDrive? It can make searching much more effective!” username=”samvardanega”]
Tip 3: Use the ‘creator’ search operator when searching a Shared drive
Google Drive also has several other advanced search options (operators) that are not shown in the advanced search box. One of these is the creator: option. You can use this to find documents in a Shared Drive (Team Drive) that have been created by a specific person. This is different to the ‘owner’ search option, because files in Shared Drives are not owned by a specific person.
In the example below, I would find all the Shared Drive files that were created by Adrian.

You can learn more about the search options in Google Drive in this Google help article.
[bctt tweet=”Here’s how to use the ‘creator’ search operator to find files in #GoogleDrive Shared Drives” username=”samvardanega”]
Tip 4: Limit your search to a specific folder or Shared drive
By default, a Google Drive search will search everywhere – your My Drive, Shared with me and all the Shared Drives (Team Drives) that you have access to. Again, this can produce a lot of search results! To reduce the number of results, you can limit your search to a specific folder or Shared Drive. There are a few different ways to do this:
- By using the ‘Location’ option in the advanced search box.
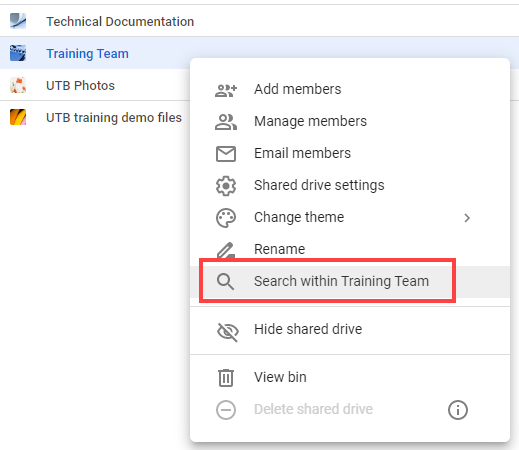
- By right-clicking a folder or Shared Drive and choosing the Search within option.

- By clicking the folder name in the breadcrumbs (the path to the current location, e.g. ‘My Drive’ > ‘Folder name’ shown at the top of the file list) and choosing the Search within option.

Tip 5: See where the file is stored
Often we are searching for a file because we have no idea where it is stored. This is particularly common in organisations with large and disorganised folder structures. As such, once you have done a search and found a file, it can be useful to learn where it is stored. There are several ways to do this:
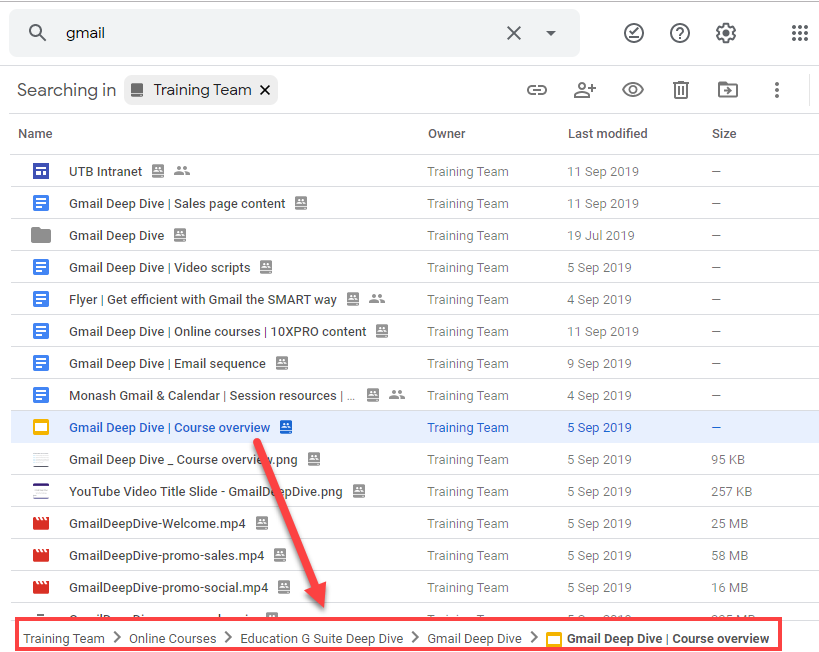
- By selecting the file in the search results (one click) and viewing the file path at the bottom of the screen.

- By right-clicking the file in the search results and choosing the View details option (this is also the ‘i’ button in the top right corner of Google Drive). Then click the Details tab to see information about the file, including where it is stored. The advantage of using this method is that it will show you if a folder is stored in multiple folders (learn how to do this here), and let you remove it from just one folder.

[bctt tweet=”How can you see where a file is stored in #GoogleDrive? Here’s two ways.” username=”samvardanega”]
If you start putting these five tips into practice, you’ll become less frustrated with Google Drive and more efficient at finding what you want, when you want it! We’d love to hear if these tips are useful, please use the comments field below to let us know.
Want to search more better in Gmail too? Check out these posts searching effectively in Gmail, how to search for Google Drive shared emails in Gmail and how to save a Gmail search.


