Hi. My name is Lara and I’m a Google Sheets junkie. It all started when I was looking for a way to streamline my planning and track student progress. From there, it’s really spun out of control. I now find myself using Sheets not just at work, but also at home, and it’s really started to affect me in ways I never imagined it would.
If you haven’t played around with Google Sheets before I congratulate you on even clicking to read this post. There’s something about spreadsheets that strikes fear into the souls of the uninitiated. However, once you dip your toe into the beautiful, organised world of Google Sheets, I don’t think you’ll look back.
This blog post will outline a few ways I used Google Sheets as a classroom teacher. My next blog post will have five starter tips that would have eased my frustrations when I started using Google Sheets. Keep an eye out for it if you’re new to Google Sheets!
PLANNING
I switched from doing my planning in a planning book quite a few years ago. I dabbled with Word, Docs and other online tools before finally settling on Google Sheets.
I would create one spreadsheet per term and have a tab for each week along the bottom. On each tabbed sheet I would have my basic outline of the timetable (duplicated from where I made it on the first tab), to which I’d add lesson notes and links to any online resources (including files in my Google Drive).
Different subjects were colour coded using conditional formatting. This only needed to be done one time, in the initial timetable outline. I had hyperlinks to other spreadsheets on each tab that had more in depth planning for each subject I taught.
This is also a really easy way to plan collaboratively with your colleagues as you can share the one document, with all your planning and links in one place.
[bctt tweet=”Using Google Sheets for planning will keep you organised and save you time!” username=”lara_kirk”]
TRACKING STUDENT PROGRESS
I had a few different ways I used Sheets with student data, but in the end I found that having one spreadsheet for all assessment data worked really well. I had tabs for different subjects and colour coded these (right click on the tab name and select ‘change colour’). This made it really easy to flick between subjects and find what I was looking for.
For me, once I figured out how to use the sort function and conditional formatting I became so much better at being able to use Sheets to track student progress. For example, if I wanted to quickly group students for a task I could quickly sort them by level, mark etc. If I wanted to see progress over time I could format the sheet to assign different colours to different levels and easily observe changes and progress based on colour. Because I’m also a colour junkie I would use a spectrum of colours to show lowest levels to highest, e.g. red (lowest – alarm bells), orange (low), yellow (middle), green (exceeding), blue (smashing it). A system like this allows you to see changes not only for individuals but for the whole group, helping you to reflect on best practice.
Read more about conditional formatting in here and Adrian’s post with three great tips for working with data.
[bctt tweet=”Using conditional formatting to track student progress is a breeze in Google Sheets!” username=”lara_kirk”]
MEETINGS
We love meetings don’t we? Especially ones that are all admin and could have been shared in an email, right? No. No we don’t. No one does.
Taking admin items out of face to face meetings means that precious teacher PLD time can be used to actually provide professional learning and growth opportunities for staff.
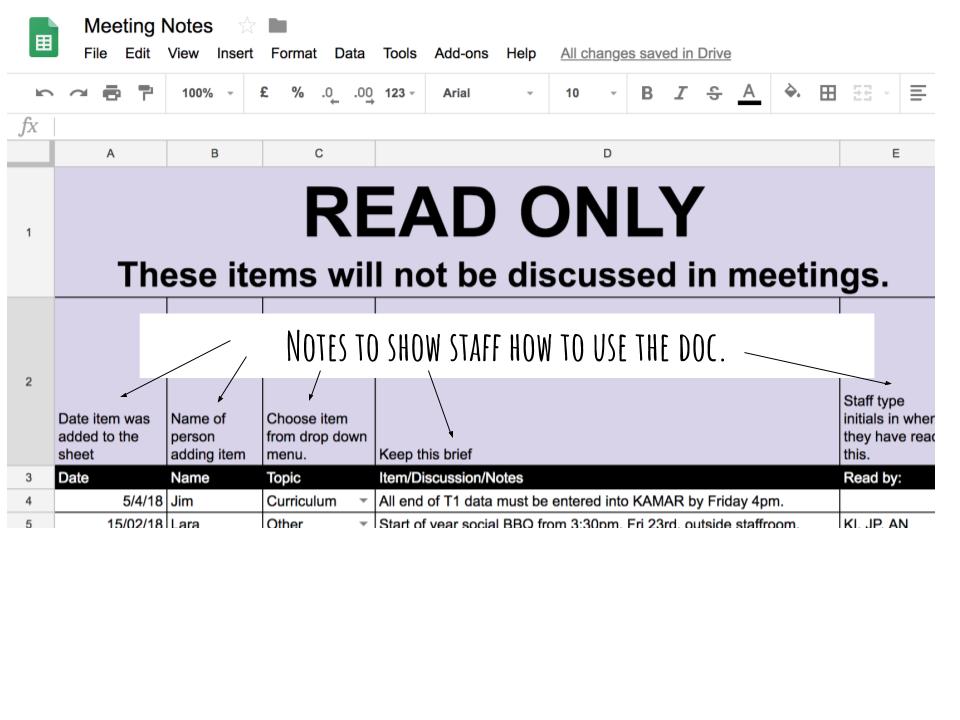
Google Sheets is a great place to do this. For example, you could have a spreadsheet that was accessible by all staff for admin items that do not require further discussion, or at least not with the whole staff. Drop down boxes can be used to organise items and, if necessary, you can get staff to initial when they’ve seen each item. Create new rows above the last item (right click, Insert row) so that the most recent item is at the top.
You could have another tab with the agenda for other meetings as well. If you don’t want everyone to edit this you can protect just this sheet and adjust the permissions from the menu when you right click on the tab name.
USED WITH FORMS
Ever been in charge of planning a school camp or trip? Permission slips getting you down? All that info that you need to organise and have access to while you are out on the trip! Using Google Forms and then Sheets makes this so much easier!
Simply create a form with all the info you want to know from parents, email it home and once they’ve completed it all the data will be there in Google Sheets. If you are asking for parent help, make sure the Form ‘branches’ so you can collect more information (phone numbers, car rego’s etc) from those who have offered to help.
If you have the Google Drive or Google Sheets app on your phone, all this information will be available to you from your mobile while you are out on the trip.
[bctt tweet=”I’m a Google Sheets convert and you can be too!” username=”lara_kirk”]
So, have I convinced you to give Sheets a go? We’ve only just scratched the surface!
Go on, try something out in Google Sheets. Trust me, once you start you won’t want to stop. You’ll find yourself talking to people about Sheets. You’ll be figuring things out in no time and it will change the way you do things. You’ll become more efficient and organised.
Head over to our web page or download the Using Technology Better app (iOS or Android) to stay up to date with our blog posts and upcoming events.
[bctt tweet=”Click here for great ideas on getting started with Google Sheets!” username=”lara_kirk”]
