How envious does it make you feel when you hear a colleague talk about the 23 students in their class when your class roll is sitting at 32? Catering for all of those students with just one teacher in the classroom can, quite often, be a tiring experience. Developing independent work habits in our students not only helps to develop the tools that they will need when they enter the workforce but it can also help alleviate the stress of having 32 young minds all wanting your attention at the same time. Hyperdocs may just become your new best friend.
What exactly is a hyperdoc?
It is a Google Doc or Google Slide that contains instructions, links and tasks, to get your students thinking more independently. Focusing on creating opportunities for choice, exploration, and ways for your students to apply their knowledge is the key to creating a useful HyperDoc.
I discovered, that in order for my students to be able to use hyperdocs effectively and build independent work habits, I needed to begin with a simple version and scaffold them through how they work. The more we used them, the more I could begin to build into them. The students became more independent in their work habits and became more engaged as I began to offer them more agency in their learning.
[bctt tweet=”Create hyperdocs to encourage independent learning in your classroom” username=”donnagolightly1″]
So how do you build up these hyperdocs?
Firstly, decide if you want to use Docs or Slides for your Hyperdoc. Both have similar capabilities so it really comes down to a personal preference. The following questions may help you to choose
Which tool do you personally prefer working with?
Which tool are your students more familiar with?
What is the purpose of the hyperdoc you are going to create?
The answers to these questions will help you to determine which tool you use.
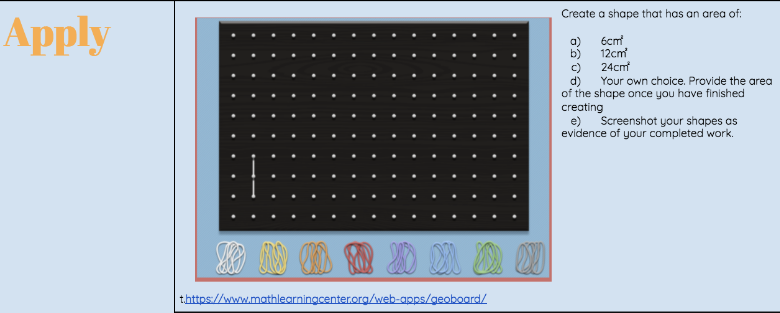
Begin by creating a Google Doc (or Google Slide) around a relevant topic that you are focusing on, e.g. maybe you’re looking at area within your maths programme. You can create your own layout or make a copy of the many templates that are available online. Think about whether landscape or portrait would be more appropriate.
Follow these steps to create your hyperdoc:
Step one:
Give your Doc a name and add your title.


[bctt tweet=”Use word art to create attractive titles in Google docs” username=”donnagolightly1″]
Step two:
Create a 2 x 7 table – 2 columns and 7 rows.
- I like to start with the learning intentions so the students knew the focus for the task.
- Underneath the WALT list the success criteria so students can go back and check off what they have learnt and can see what they still need to work on.
- To begin with I would step the students through this and we would build the success criteria together.

Step Three:
Add some content that will support the ideas you want the students to develop and the criteria you are working towards.
- Add links to websites that contain tutorials or information that will support the learning intentions you are focusing on.
- Add videos that the students can go back and revisit to deepen their understanding. This means they don’t have to wait for you to help them all the time.

[bctt tweet=”Add links to Google Docs to direct students to specific sites” username=”donnagolightly1″]
Step Four
Build the content that you want the students to work on.
- You can add instructions as to how you would like the students to complete the tasks.
- Add activities that can differentiate the learning for the range of students that are working on the tasks.
- Include a variety of activities that engage the students in a variety of ways.
Step Five
Provide an opportunity for the students to reflect on their work
- Encourage students to go back to the success criteria and check off the what they think they have achieved. How can they show evidence of this?
- What are their next steps?
- Are they able to help other students complete their tasks?

Once you’ve built your hyperdoc the way you want it, share it with your students. You’ll be amazed at how quickly you can build up student agency within your class programme and how much more independent your students can become. You can even collaborate with a colleague and build hyperdocs that can be used across your team.
Want to know more about developing independent work flows with your student? Check out the UTB website for more tips and ideas you could use.
