We are teaching in exciting times – for teachers in New Zealand, National Standards have disappeared and we can again begin to get a bit more creative with our lesson planning ideas. For teachers elsewhere, many countries now have a digital technology curriculum which encourages teachers to think more carefully about how they could integrate digital ideas into existing curriculum areas.
This idea of integration is one that we get asked about a lot! Many teachers are unsure just how they could bring coding, robotics, digital activities or technology in general into their programmes without making it a stand-alone ‘something else’ they have to find time in their day to fit in.
[bctt tweet=” #Digital technology needs to be integrated, not stand-alone, #UTB can help you get started” username=”donnagolightly1″]
Some schools are very siloed in their approach to their curriculum and have very clear cut times for each subject, while others take a more integrated approach. Whichever way your team operates there are some simple ways to begin integrating digital technologies and encourage creativity, collaboration, communication and problem-solving with your students.
Here are three simple ways to get you started:
Jo Boaler tells us that when students represent their mathematical thinking diagrammatically, not only do they develop the visual pathways in their brain, but they also retain the concepts in more meaningful ways. (Of course, this doesn’t only happen with maths – it’s applicable to other curriculum areas also.)
There are two ways we can leverage this idea with digital technologies in our classroom.
The first way is to ask your students to draw representations of their maths thinking in their books or on paper. For me, the limitation with this is that in order to add explanations of their drawing and thinking in other ways, it means they can only use words and/or numbers. It doesn’t allow them to use one of their greatest assets – their voice. Unless once they have finished recording their ideas this way they use their device’s camera to capture their work. They could then use a tool like PowerPoint, Keynote or Screencastify to record their voice explaining their thinking even more deeply.
[bctt tweet=”Use voice recording tools so Ss can explain their thinking as well as show it.” username=”donnagolightly1″]
The second way to do this is by allowing your students to use digital drawing tools from the beginning. They can then easily screen record at the same time as they are ‘showing their maths’ and really paint a picture of just how thorough their understanding of a concept is.
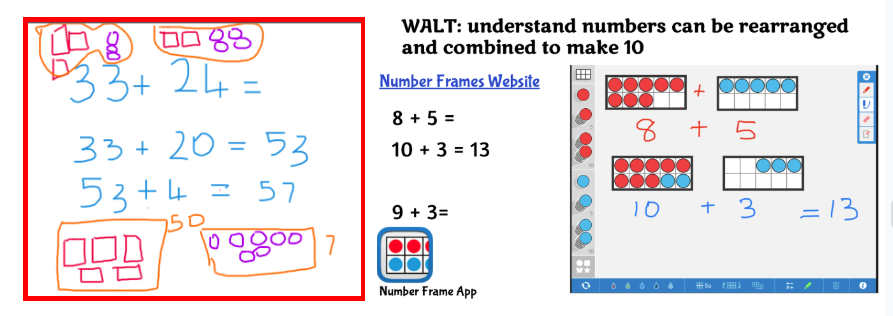
If you use Office 365 and have touch screens they can so easily do this within OneNote or PowerPoint. If you’re an Apple school with pencils, or a stylus, they could do this in quite a few different apps – Keynote, Pages, Notes or even Numbers.
For Chromebooks with a stylus you can use sites such as canvas.app (works with your Chrome account and saves the images you make), DrawIsland or Sketch.io (both free online drawing sites that require you to download your work to save it). Using Google’s Jamboard would allow your students to create a multipage curation of their thinking.
Imagine how much more of an insight you would have into their understanding if you could hear their thinking as they are creating their images – screen recording and explaining their thinking as they work gives you invaluable insights – that you can access anytime from anywhere.
Number two: retelling ideas with code
Listening to a student retell the main idea of a story is a great way to gauge their understanding. Allowing them to use a programme like Scratch 3.0 is a really engaging way for them to show what they know. As a teacher you don’t need a lot of knowledge of how the application works yourself – you just need to be willing to give it a go. You’ll be surprised how much some of your students know and it’s a great way to show that learning is a lifelong journey. How awesome would it be to learn alongside your students!
Scratch has endless possibilities, really only limited by your imagination. Asking your students to retell the main ideas through coding an animation of the characters in their setting requires a lot more critical thinking by your students while integrating digital technologies at the same time. Not only are they having to decide what the important ideas were in the story, but they’re also developing a knowledge of algorithms and code at the same time.
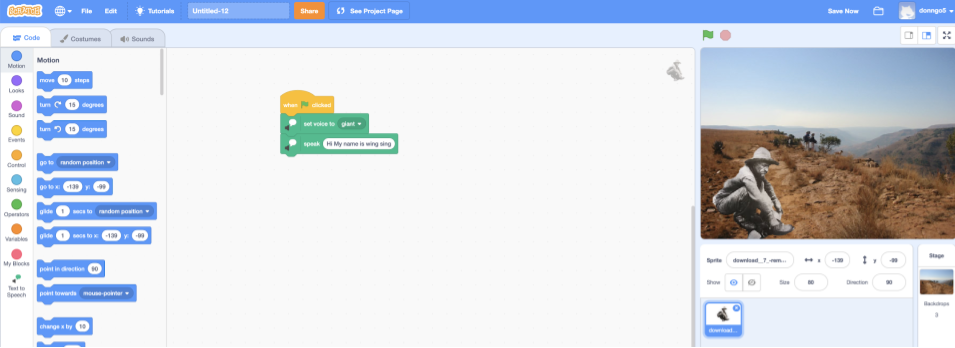
You could have your students explain what they discovered from a research activity, they could explain how a maths strategy works or even narrate the beginning of personal story they are writing. Offering them the opportunity to show what they know through a coding programme can be a more engaging way to do the task.
[bctt tweet=”Ss can use #Scratch to show what they know in almost any curriculum area!” username=”donnagolightly1″]
Number three: introducing robots into the process
Many schools have jumped on board the technology train and purchased robotic tools such as Spheros, micro:bits, Makey Makeys, mBots, Edisons, Bee-Bot’s…just to name a few. For many though, the purchase wasn’t driven so much by a desired outcome, rather it was driven by the idea of having ‘technology’.
These devices or ‘toys’ as some people refer to them, can end up becoming another ‘thing’ that gets used once then stored in a back cupboard somewhere, rarely seeing the light of day again.
They really need to be purchased only after much discussion – and that discussion needs to be centered around the purpose. What exactly do you want the outcome of the use of these tools to be? How versatile are they? Are they able to be used in differentiated ways? Where do they sit on the continuum of value for money? Are they able to be adapted and used in a variety of ways? Once you have a clear vision around why you should purchase them then they are far more likely to be used in a meaningful and purposeful way.
One of the robotic tools I like is the Sphero. There are 4 different ways it can be operated, including 3 different levels of coding, (drawing, block coding and JavaScript – as well a simple driving wheel.) Not only that – it has a comprehensive education community so you don’t need to reinvent the wheel all the time. There are many lesson ideas in the Activity tab that can be filtered by level or subject.
Integrating the use of these types of devices just needs a little bit of creativity. One activity that I did recently was a maths activity with eight and nine year olds. The class was focusing on multiplication and division strategies. We had a number of problems of all different types printed out on cards and scattered face down around a defined area. The students had to code their Sphero to stop on top of a card – that in itself used many skills. They had to collaborate with their buddy while estimating speed, distance and time. Once they had their Sphero on a card, they flipped it over and solved the problem. They then used the strobe function to ‘show’ their answer (one colour for the digits and a second colour to differentiate between the digits) followed by the speak block to tell us the answer.
[bctt tweet=” Use #sphero integrate #coding with mathematics – super easy!” username=”donnagolightly1″]
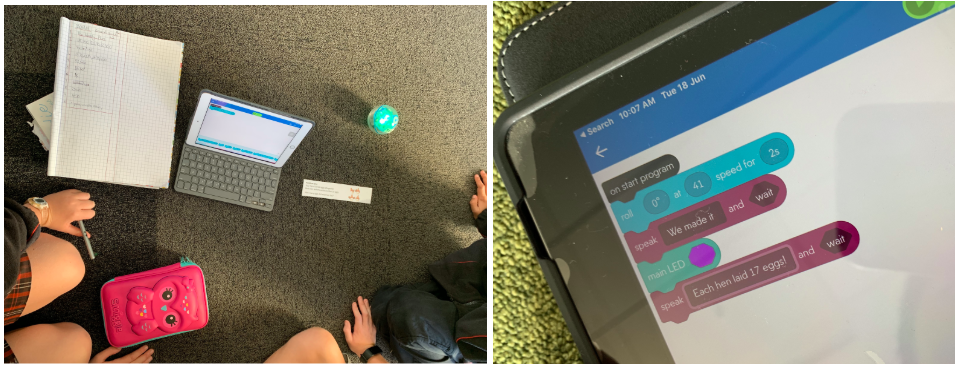
Engagement was high and students were eager to move between the maths problems.
Just remember – if it’s the first time your students have experienced any of these digital tools they will need a ‘sandpit’ time to explore and investigate. You may find the first time you use them the student’s output is reduced but this will soon swing back once they understand the tools and are more familiar with how they work.
If you’d like more ideas about the NZ Digital Technology Curriculum you could check out this post on getting started with it here, or Mark’s post on digital learning with the Sphero here.
