Recently I worked with a class who wanted to enter a local competition to win Basketball tickets for a big game. The challenge was to create a 30 second video about a ‘Noisey Class’ so I thought this would be the perfect opportunity to use the ‘3 Shot Movie’ technique.

I have used variations of this method but reducing the shots down to this simple 3 step method is a great way to introduce students to the art of film making, visual story-telling, and the mechanics of iMovie. I saw this demo’d at a recent GAFE conference by Jim Sill (an ex-producer and now Edtech trainer).
The 3 shot movie is basically;
- the wide shot (distance)
- the medium shot
- the close up
[bctt tweet=”“Using the 3 shot movie method is an achievable way to teach students to be storytellers.”” username=”mikereading”]

This is such an easy way to structure a short movie, a great way to tell a story, and it’s a good exercise to take the students through. You can easily see these forms of shots in other movies when you know to look for them.
You could also discuss the purpose of each shot in helping to tell the story
- the wide shot – gives context
- the medium – shows more about the characters
- the close up – gives more detail.
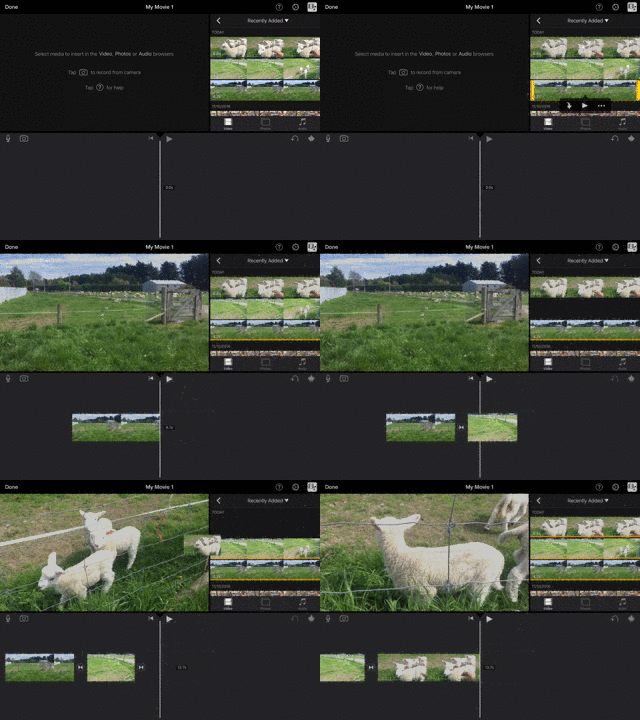
Once you’ve taken the three shots it’s super simple to add those clips into your project in the native Apple app, iMovie. Just touch on the video icon, select the ‘recently added section and then the clip you want to add. Then you’ll be given the ‘include’ down arrow and it will drop into the part of your movie where the vertical white line is sitting.

On a Chromebook, an easy way to create your 3 Shot Movie is to upload your clips from your camera to the Youtube Editor via the Google Photos app. Once the clips have been uploaded to your account you can upload them with the Youtube Editor from your Google Photos.
[bctt tweet=”Youtube has a great video editing tool, almost hidden inside the dashbaord. Your Chromebook is a movie maker, too!” username=”mikereading”]
I often recommend putting your video clips into a Google Photos album from your device (iPad, tablet or camera) – this makes them easy to find and import into the Youtube Editor. From there you open the editor, create a new project and drag the clips from the video section down to your ‘timeline’ below.


