Share class videos with Microsoft Stream

Share class videos with Microsoft Stream

If your school uses Microsoft Office 365, you and your students will probably have access to Microsoft Stream. This video tool makes it very easy for teachers and students to securely share videos within classes and the wider school. The best part is that it is integrated with Microsoft Teams, so if you are already using a Team with your class, it’s super easy to start using Stream with them too. In this blog post, I’ll show you how to use Microsoft Stream to share videos with your class, and how to set it up so that students can also share videos with you and the class.

Note: Before planning to use Microsoft Stream with your students, it is a good idea to ask your Office 365 administrator (usually your IT support team) if the service is enabled for teachers and students.

Step 1: Access Microsoft Stream

1.  Sign in to your Office 365 account with your school login.
2. Look for the Stream icon on the Office 365 landing page. If you don’t see it, click Explore all your apps. You can also use the link https://web.microsoftstream.com/
Note: If you still do not see Stream in the list, or the above link does not work, your Office 365 administrator may have disabled the service. Have a chat to them and see if you can get the service enabled.

ms-stream-1

3. Click the Stream icon to open Microsoft Stream. You will be taken to the home page.

ms-stream-2

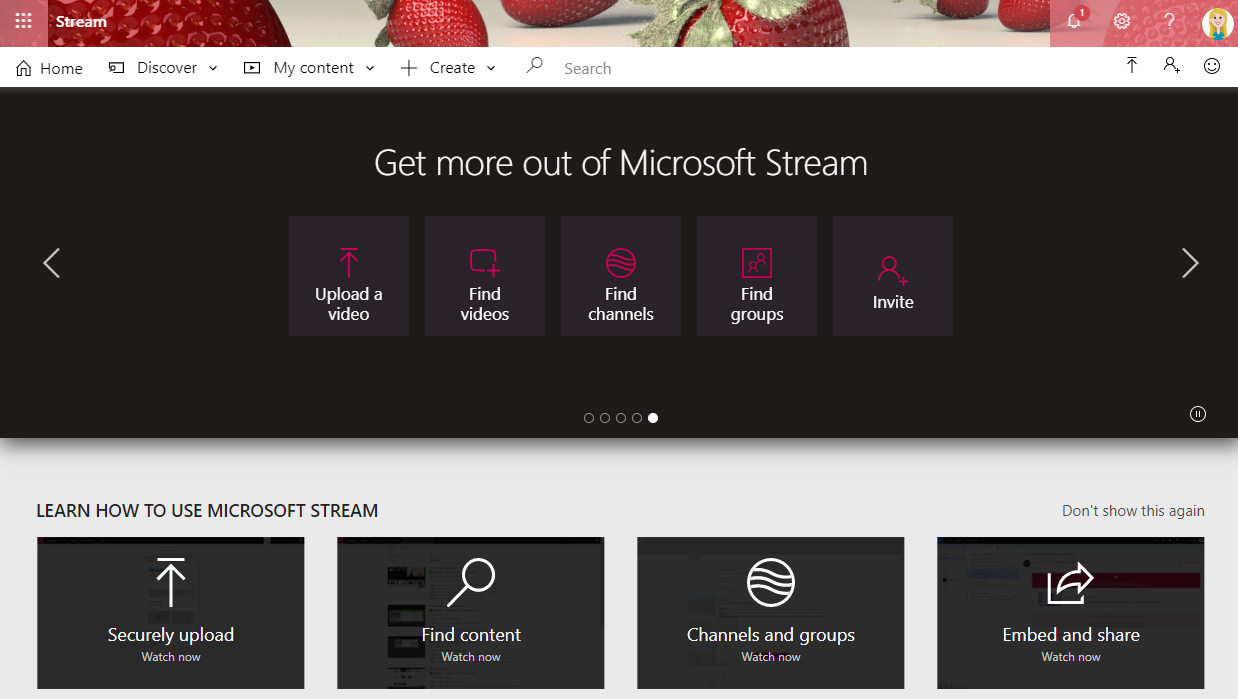
Note: These are the same steps that your students can use to access Microsoft Stream.

[bctt tweet=”#Microsoft #Stream is a great way to securely share videos with your class. Here’s how to get started” username=”samvardanega”]


Step 2: Create a Group for your class

Groups in Microsoft Stream are used to securely share content with specific people. They are based on Office 365 Groups. As such, if you’re already using Microsoft Teams with your students, you will already have a group for them in Stream. Even if you’re not using Teams, you may also have a group that has been created by your Office 365 administrator for another purpose. So, let’s start by checking your existing groups.

1. Click My content in the top toolbar > Groups.

ms-stream-3

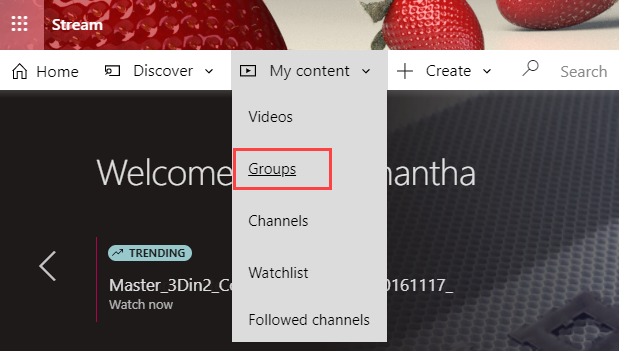
2. A list of all your Groups will be shown.
Note: Your students can also use steps 1 and 2 to access the Groups they are members of.

ms-stream-4

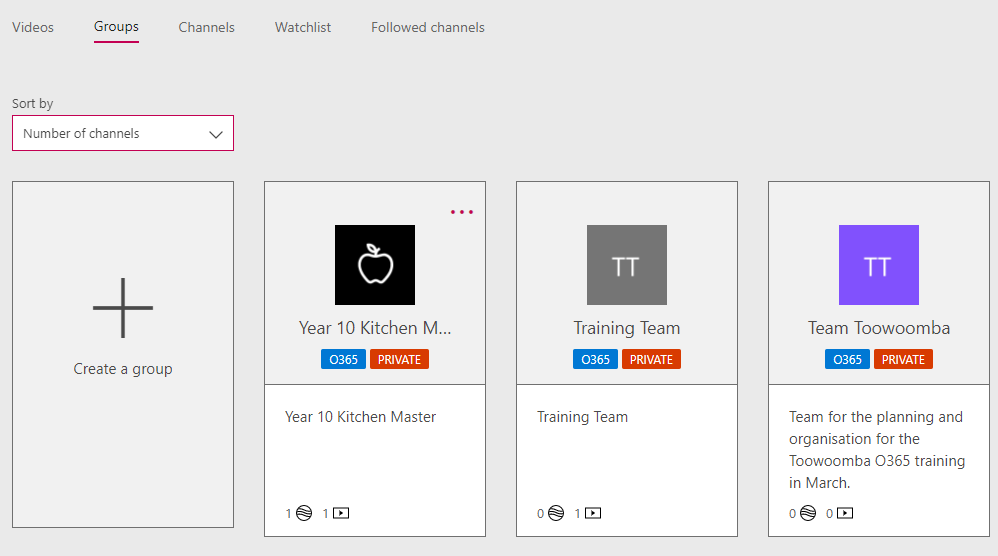
3. Browse the list to see if you already have a group for your class. If yes, then skip ahead to section 3 of this post. If you don’t have a group, stay here for the next step!

4. Click Create a group.
Note: If you don’t see this option, your ability to create groups may have been restricted by your Office 365 administrator. Ask them to create a group for you and make you a manager. Once you have done that, skip ahead to section 3 of this post.

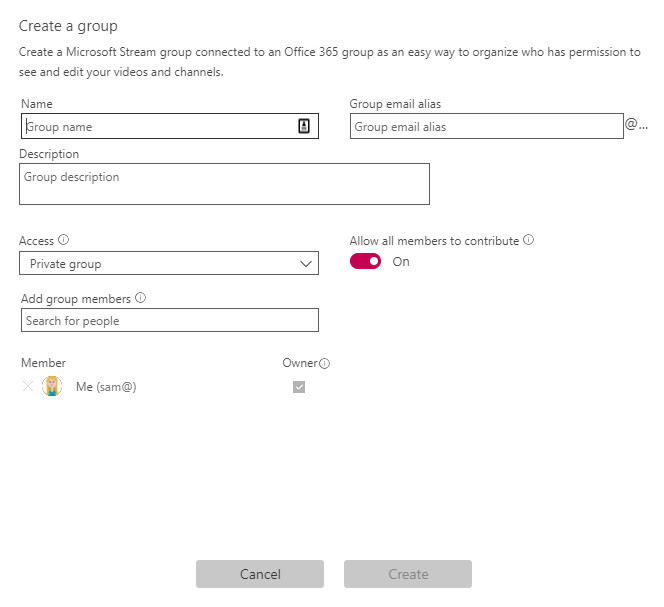
5. Enter a name and description for your group.

6. Choose if you want a private or public group. A private group means that only members of the group (e.g. your class) will be able to see the videos shared to the group. A public group means that the videos will be viewable by everyone in your school.

7. Use the Add group members box to search for your students.

8. Toggle the Allow all members to contribute option on or off, depending on whether you want your students to be able to share videos with the group. For example, you would leave this enabled if you want your students to upload videos as part of a task or assignment.

9. Click Create.

ms-stream-5

[bctt tweet=”If you’re using #Microsoft #Teams, check out how #Stream can help you easily share videos with your class.” username=”samvardanega”]


Step 3: Access and manage the Group

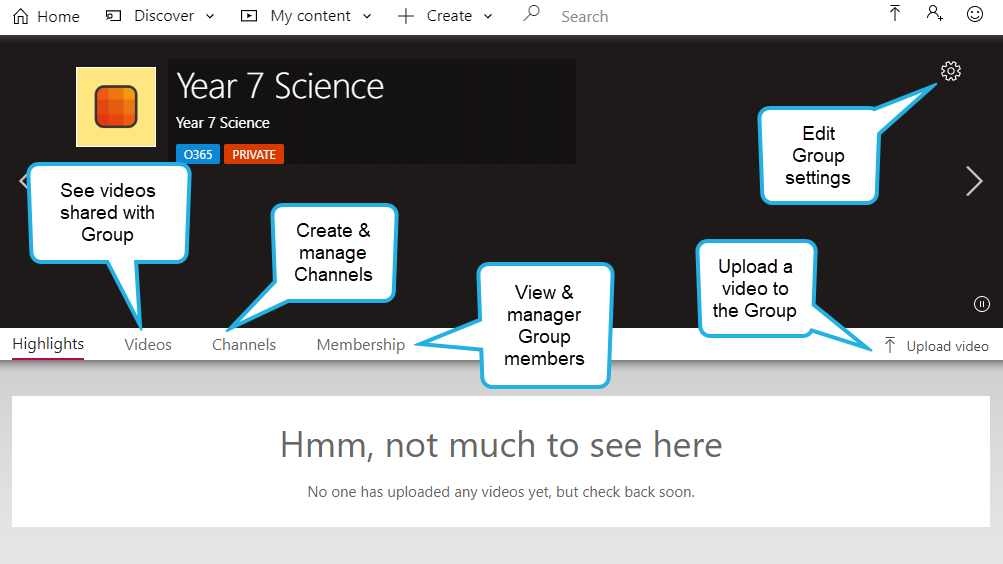
Once you have created a Group, you can view its shared videos, add channels, view and manage members and edit Group settings.

1. Click My content in the top toolbar > Groups.

2. Click on the Group you want to access.

3. The Group will open.

  • Click the Videos tab to see videos uploaded to the group.
  • Click the Channels tab to add, view and manager channels (more on this in the next section).
  • The Membership tab is for viewing and managing Group members.
  • You can edit group settings from the Settings (cog) button- including if students are allowed to add their own videos to the group.
  • You can upload a video directly to the Group using the Upload video button (more on this in section 5).

ms-stream-6

Step 4: Create Channels to organise your Group

Channels in Microsoft Stream are used to categorise and organise videos. You may like to create channels for different topics or areas of study, or for specific student projects or tasks. These latter channels would be particularly useful if students are going to upload their own videos, as it would allow you to easily view all their videos in the one place. Follow the steps below to create a channel.

1.Click My content in the top toolbar > Groups.

2.Click on the Group you want to access.

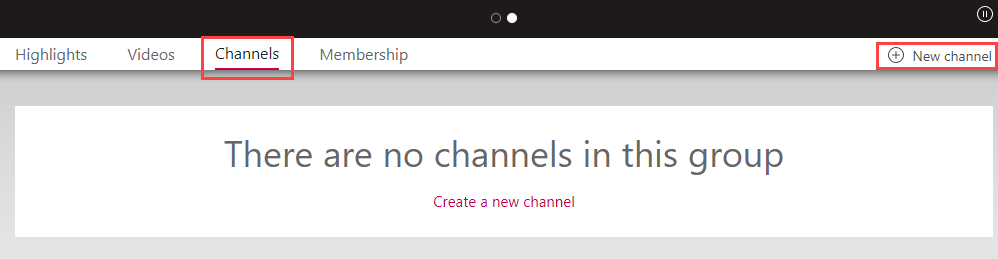
3.Click the Channels tab.

4.Click the New channel button.

ms-stream-7

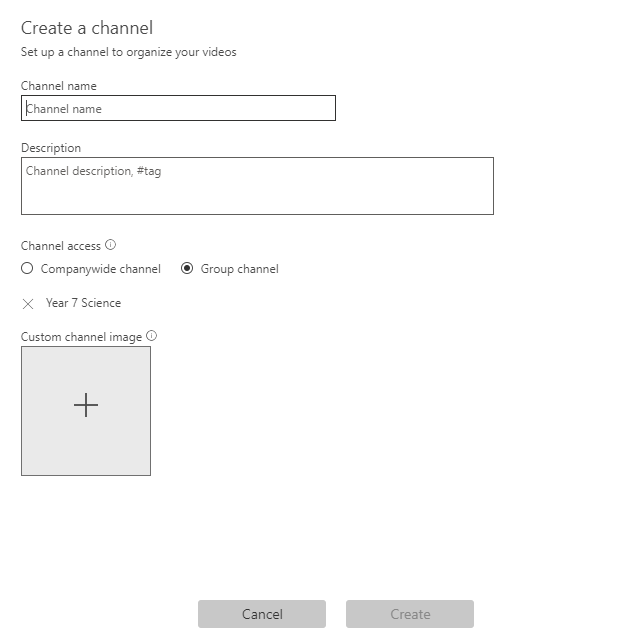
5. Enter a Channel name and Description.

6. Make sure the Group channel option is selected, and the name of your group is listed below.

7. If desired, upload an image to customise your channel.

8. Click Create.

ms-stream-8

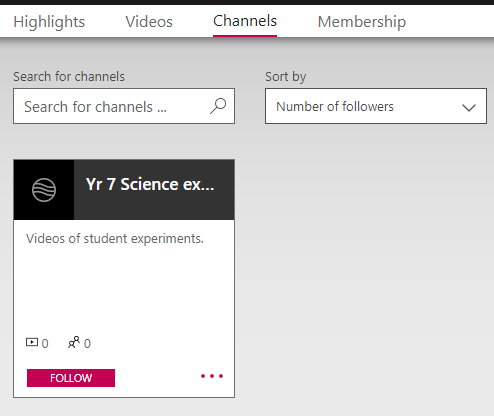
9. The channel will be shown in the Channels tab. Your students will also be able to see this channel.

ms-stream-9

[bctt tweet=”Use Groups and Channels in #Microsoft #Stream to easily share videos with your class.” username=”samvardanega”]


Step 5: Upload videos to your Group and add them to a channel

Now that your Group and channel are ready to go, it’s time to upload a video! These are the same steps that your students can use to upload videos.

1. Open your Group and click the Upload video button.
2. Browse for the video you want to upload (via Windows Explorer or Mac Finder).
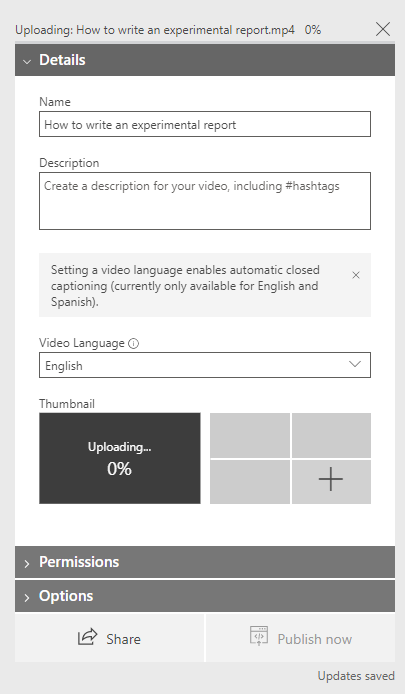
3. The video will begin to upload. In the Details section, edit the name of the video (if required) and add a description. After the upload has finished you can also choose a video thumbnail.

ms-stream-10

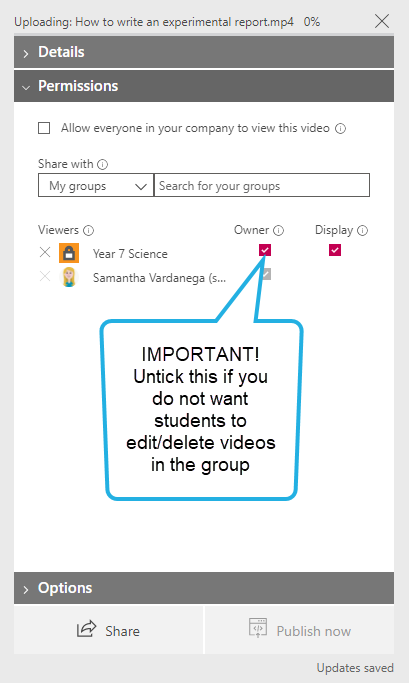
4. Click the Permissions section to expand. Check that the video is being shared with the correct group. IMPORTANT: Untick the owner box next to the group name if you do NOT want other members of the group (e.g. students) to be able to remove or edit the video. You can learn more about video permissions here.

ms-stream-11

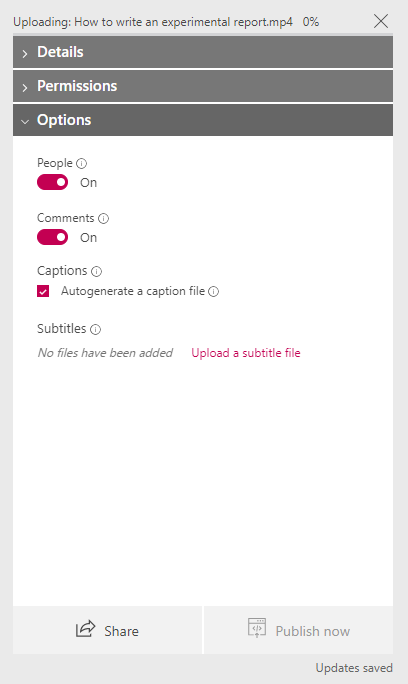
5. Click the Options section to expand. Choose to enable or disable the following settings:

  • The people option can automatically find people’s faces in your videos (if this is enabled in your Office 365 environment).
  • Comments allows others to comment on videos.
  • Captions are a text version of what is spoken in the video. Viewers of the video can use the ‘CC’ button to show captions. This is great for students with hearing difficulties.

ms-stream-12

6. Wait for the video to finish uploading, then click Publish now.
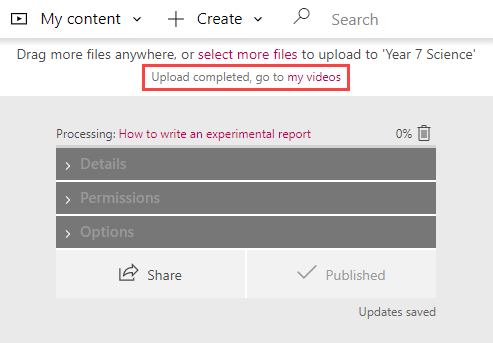
Note: After the video has uploaded it will begin processing. This can take a few minutes. After processing is complete your video will be ready to view.

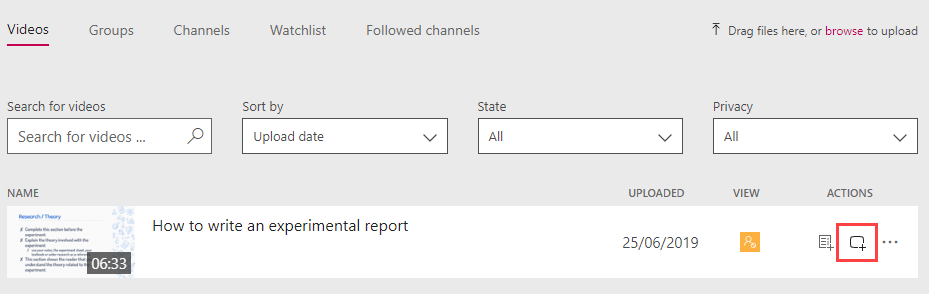
7. Click the ‘my videos’ link to quickly navigate to your video list.
Tip: You can also click My content > Videos in the top menu.

ms-stream-13

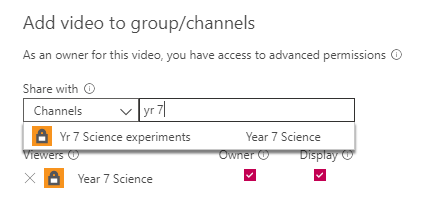
8. Your uploaded video will be shown. Click the Add to group/channel button (shown below) to add the video to a channel.

9. Change the Share with box to ‘Channels’ and type in the name of the channel to search for. Select the channel and click Save.

ms-stream-15

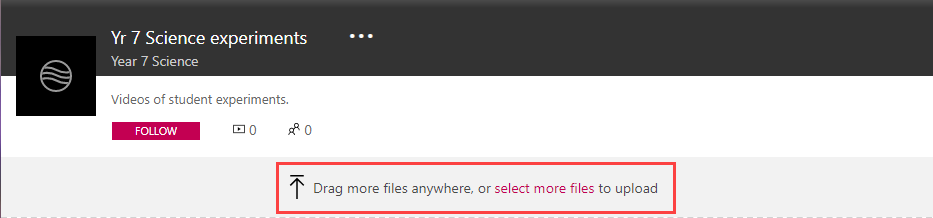
Tip: To save even more time, you can also upload videos directly to channel. To do so, navigate to the channel first and then click the option to Drag more files anywhere, or select more files to upload.

[bctt tweet=”Here’s how students can use #Microsoft #Stream to easily share videos of their work!” username=”samvardanega”]


Learn more about Microsoft Stream

If you want to learn more about Microsoft Stream, here are a list of useful help articles from Microsoft:
Get started with Microsoft Stream
Create a group in Microsoft Stream
Groups and channel settings in Microsoft Stream
Upload a video
Permissions and privacy in Microsoft Stream
FAQ

Want to learn more about Office 365?
Check out our FREE Getting Started with OneDrive online course.


Related Post

The right ways to enable AI at work – Tips for IT Lead

In today’s fast-paced workplace, maximizing efficiency while minimizing time spent on repetitive tasks is crucial. However, many staff members may feel unsure about integrating AI effectively, leading to missed productivity opportunities. As the IT lead, you can guide your team in harnessing AI’s power to streamline operations and save time. By providing clear guidance and

VIEW POST

Apple for Business: from Survive to Thrive series

Unveiling Apple’s Hidden AI: The Power of On-Device Machine Learning In an era dominated by data, information, and images, the ability to efficiently navigate through vast digital libraries is paramount. Apple, known for its innovation in both hardware and software, has quietly introduced a game-changing feature in its Photos app, harnessing the prowess of artificial

VIEW POST

How well do you use the
Apple Apps Google Workspace Microsoft 365
tools in your workplace?

Find out if you’re working with the tools OR if you’ve got the
tools working for you.

What Industry Are You In?

Using Apple Apps, Google Workspace or Microsoft 365?

What Type of user are you?

🫣 Entry User | 🤹 Skilled User | 👑 Elite User

Take the quiz to find out. 

Privacy Policy

Using Technology Better Privacy Commitment

Introduction

We hold the privacy of your personal information in the highest regard.

Using Technology Better regards customer privacy as an important part of our relationship with our customers. The following privacy policy applies to all Using Technology Better users, and conforms to Internet privacy standards.

This policy will be continuously assessed against new technologies, business practices and our customers’ needs.

If you have questions or concerns regarding this statement, you should first contact the support team on our Contact Us Page.

Collection of Information

In order to use the Using Technology Better website, we may require information from you in order to provide the best service possible.

All correspondence may also be collected and stored, particularly in regard to sales, support and accounts, including Email.

Any information collected by Using Technology Better is collected via correspondence from you or your company. This may be via the telephone, Email, mail, fax or directly through our website.

Visitors and customers of japan.usingtechnologybetter.com will have their information shared back to DAIWABO INFORMATION SYSTEM CO., LTD. and DIS Service & Solution Co., Ltd.

Use of Collection Information

Any details collected from Using Technology Better customers is required in order to provide you with our

products and/or services, and a high level of customer service.

Correspondence is recorded in order to provide service references, and to assist in our staff development.

Web Site Use Information

Similar to other commercial Web sites, our Web sites utilize a standard technology called “cookies” (see explanation below, “What Are Cookies?”) and web server log files to collect information about how our Web site is used.

Information gathered through cookies and Web server logs may include the date and time of visits, the pages viewed, time spent at our Web site, and the Web sites visited just before and just after our Web site.

Storage of Collected Information

The security of your personal information is important to us. When you enter sensitive information (such as credit card numbers) on our website, we encrypt that information using secure socket layer technology (SSL).

When Credit Card details are collected, we simply pass them on in order to be processed as required. We never permanently store complete Credit Card details.

We follow generally accepted industry standards to protect the personal information submitted to us, both during transmission and once we receive it.

If you have any questions about security on our Website, you can email us at <ContactEmail>.

Access to Collected Information

If your personally identifiable information changes, or if you no longer desire our service, you may correct, update, delete or deactivate it by emailing us at <ContactEmail>.

Orders

If you purchase a product or service from us, we may request certain personally identifiable information from you.

You may be required to provide contact information such as:

Name

Email

Postal address

Your school or organisation

Financial information (such as credit card number, expiration date, name on card, card billing address).

We use this information for billing purposes and to fill your orders. If we have trouble processing an order, we will use this information to contact you.

Communications

Using Technology Better uses personally identifiable information for essential communications, such as

Emails

Accounts information

Critical service details.

We may also use this information for other purposes, including some promotional Emails.

If at any time a customer wishes not to receive such correspondence, they can request to be removed from any mailing lists by contacting support.

You will be notified when your personal information is collected by any third party that is not our agent/service provider, so you can make an informed choice as to whether or not to share your information with that party.

Third Parties

Using Technology Better may at its discretion use other third parties to provide essential services on our site or for our business processes.

We may share your details as necessary for the third party to provide that service.

These third parties are prohibited from using your personally identifiable information for any other purpose.

Using Technology Better does not share any information with third parties for any unknown or unrelated uses.

What Are Cookies?

A cookie is a very small text document, which often includes an anonymous unique identifier. When you visit a Web site, that site’s computer asks your computer for permission to store this file in a part of your hard drive specifically designated for cookies.

Each Web site can send its own cookie to your browser if your browser’s preferences allow it, but (to protect your privacy) your browser only permits a Web site to access the cookies it has already sent to you, not the cookies sent to you by other sites.

Browsers are usually set to accept cookies. However, if you would prefer not to receive cookies, you may alter the configuration of your browser to refuse cookies.

If you choose to have your browser refuse cookies, it is possible that some areas of our site will not function as effectively when viewed by the users.

A cookie cannot retrieve any other data from your hard drive or pass on computer viruses.

How Do We Use Information We Collect from Cookies?

As you visit and browse our Web site, the site uses cookies to differentiate you from other users. In some cases, we also use cookies to prevent you from having to log in more than is necessary for security.

Cookies, in conjunction with our Web server’s log files, allow us to calculate the aggregate number of people visiting our Web site and which parts of the site are most popular. This helps us gather feedback to constantly improve our Web site and better serve our clients.

Cookies do not allow us to gather any personal information about you and we do not intentionally store any personal information that your browser provided to us in your cookies.

Legal

We reserve the right to disclose your personally identifiable information as required by law and when we believe that disclosure is necessary to protect our rights and/or comply with a judicial proceeding, court order, or legal process served on our Website.

Links

Links on the Using Technology Better site to external entities are not covered within this policy. The terms and conditions set out in this privacy statement only cover the domain name of usingtechnologybetter.com

Changes to Privacy Policy

If we decide to change our privacy policy, we will post those changes to this privacy statement, and other places we deem appropriate so that you are aware of what information we collect, how we use it, and under what circumstances, if any, we disclose it.

We reserve the right to modify this privacy statement at any time, so please review it periodically. If we make material changes to this policy, we will not use the personal information you have submitted to us under this Privacy Policy in a manner that is materially inconsistent with this Privacy Policy, without your prior consent

Delivery Policy

Most goods are digitally delivered instantly via email.  Our services may be delivered either via an online medium or live in person.

For our online delivery see below.  For services delivered live onsite, please refer to our speaker agreement form which is emailed to you on confirmation of booking.

Refund Policy

We do not offer refunds or returns unless we cannot supply goods or services or the goods or services are not delivered as promised.

Australian law is the governing body for all work, goods and services supplied by Using Technology Better.

Marketing Release

Using Technology Better (UTB) may film, record, and photograph me (the results of which are the “Recordings”). UTB may also incorporate into any production(s) any separate content (e.g., quotes, testimonials, biographical information, profiles, photos, videos, sound recordings, artwork, etc.) I provide to UTB or approve in writing (“Materials”).

1.License

I grant to UTB an irrevocable, perpetual, worldwide, royalty-free license to, in its sole discretion, (i) edit, translate, and modify the Recordings and the Materials, (ii) attribute the Recordings and Materials to me by my name, age, and city and state of residence, (iii) incorporate the Recordings and the Materials into content to promote UTB, its programs, or products (“Content”), and (iv) publicly use, distribute, reproduce, create derivative works from, and perform/display the Content, and any excerpts thereof, in any language.

2. No Compensation.

I grant this permission without any financial or other obligation of any nature.


For any issues or concerns please contact us